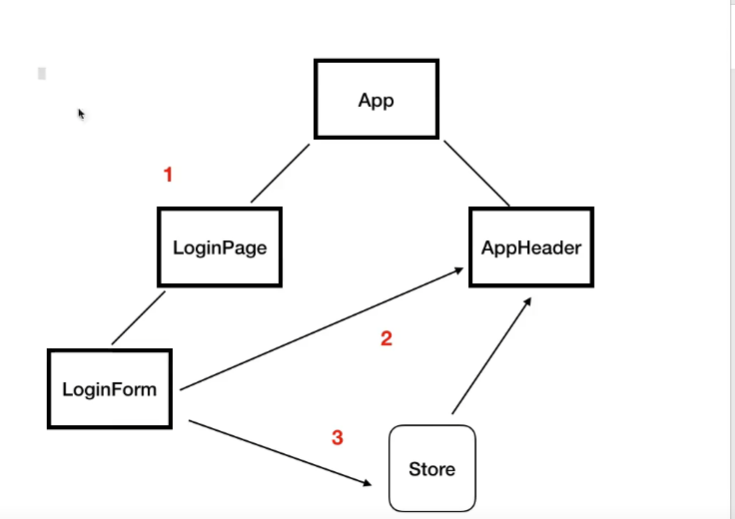
loginForm 의 결과를 AppHeader로 올려줘야 하는 상황
- 이벤트를 2번 올리고 App에서 받아서 AppHeader로 props해주거나
- 이벤트버스를 활용해서 loginForm에서 바로 AppHeader로 이벤트를 보내주거나
- store (vuex - 상태 관리 패턴) 를 활용하여 User정보를 저장하고 저장한 정보를 AppHeader에서 쓰거나
- store는 하나의 통에 담아놓고 꺼내서 쓰는 구조. 이게 가장 접근하기 쉽고 관리하기 편하다.
1. vuex 설치하기
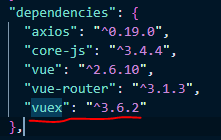
npm i vuex@3.6.22. vuex 설치 확인하기
- 설치되면 package.json 파일 dependencies 칸에 들어가게 된다.
- dependencies는 npm run build 명령어를 실행해서 최종 자원이 압축될때(JS, HTML, CSS가 나올때)
dependencies속 라이브러리들이 함께 포함되어 나온다.
- Devdependencies 에 들어가있는 라이브러리들은 npm run build 결과물에 포함되지 않는다.
(ESlint라던지 babel이라던지)
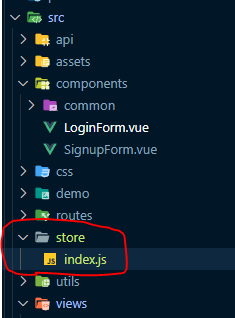
3. src 폴더 안에 store 폴더 만들어주기, store 폴더 안 에 index.js 파일 생성
4. index.js에 Vuex 연결
- store에서 state 는 여러 컴포넌트 간에 공유되는 데이터를 뜻한다.
import Vue from 'vue';
import Vuex from 'vuex';

Vue.use(Vuex);

export default new Vuex.Store({
  state: {
    username: '',
  },
});
5. main.js에 store연결
import Vue from 'vue';
import App from './App.vue';
import router from '@/routes/index';
import store from '@/store/index'; // store
Vue.config.productionTip = false;
new Vue({
render: h => h(App),
router,
store, // store
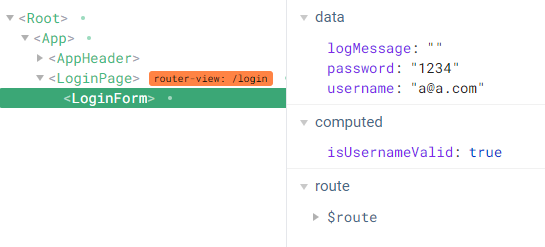
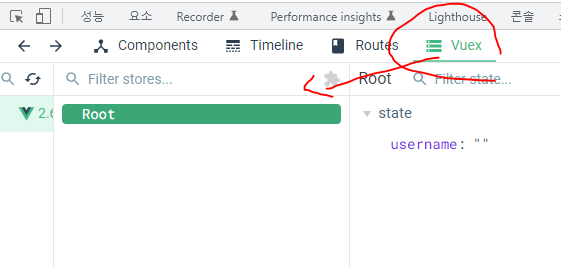
}).$mount('#app');6. 개발자도구에 Vuex 추가된것 확인 (main.js에 store 주석하면 사라짐)
7. store폴더의 index.js에 mutations넣기
import Vue from 'vue';
import Vuex from 'vuex';

Vue.use(Vuex);

export default new Vuex.Store({
  // store에서 state 는 여러 컴포넌트 간에 공유되는 데이터를 뜻한다.
  state: {
    username: '',
  },
  // mutations은 state의 값을 바꿀수 있는 유일한 방법이다.
  // mutations의 첫번째 인자는 state고, 두번째 인자는 호출할때 넘기는 값을 의미한다.
  // username을 받아서 state가 호출될때 username을 넘기겠단 뜻
  mutations: {
    setUsername(state, username) {
      state.username = username;
    },
  },
});
8. loginFrom에 this.$store.commit('setUsername', data.user.username); 코드 넣기
- 첫번째 인자는 mutations 호출, 두번째 인자는 mutations에 넘길 데이터
<template>
  <div class="contents">
    <div class="form-wrapper form-wrapper-sm">
      <form @submit.prevent="submitForm" class="form">
        <div>
          <label for="username">id:</label>
          <input id="username" type="text" v-model="username" />
          <p class="validation-text">
            <span class="warning" v-if="!isUsernameValid && username">
              Please enter an email address
            </span>
          </p>
        </div>
        <div>
          <label for="password">pw:</label>
          <input id="password" type="text" v-model="password" />
        </div>
        <button
          :disabled="!isUsernameValid || !password"
          type="submit"
          class="btn"
        >
          로그인
        </button>
      </form>
      <p class="log">{{ logMessage }}</p>
    </div>
  </div>
</template>

<script>
import { loginUser } from '@/api/index';
import { validateEmail } from '@/utils/validation';

export default {
  data() {
    return {
      // form values
      username: '',
      password: '',
      // log
      logMessage: '',
    };
  },
  computed: {
    isUsernameValid() {
      return validateEmail(this.username);
    },
  },
  methods: {
    async submitForm() {
      try {
        // 비즈니스 로직
        const userData = {
          username: this.username,
          password: this.password,
        };
        const { data } = await loginUser(userData);
        console.log(data.user.username);

        // 첫번째 인자는 mutations 호출, 두번째 인자는 mutations에 넘길 데이터
        this.$store.commit('setUsername', data.user.username);

        // this.logMessage = `${data.user.username} 님 환영합니다`;

        // 로그인 되면 메인페이지로 이동
        this.$router.push('/main'); // 자바스크립트 레벨에서 이용하는 앵커 태그 역할

        // this.initForm();
      } catch (error) {
        // 에러 핸들링할 코드
        console.log(error.response.data);
        this.logMessage = error.response.data;

        // this.initForm();
      } finally {
        this.initForm();
      }
    },
    initForm() {
      this.username = '';
      this.password = '';
    },
  },
};
</script>

<style>
.btn {
  color: white;
}
</style>
9. store폴더의 index.js에 getters넣기
import Vue from 'vue';
import Vuex from 'vuex';

Vue.use(Vuex);

export default new Vuex.Store({
  // store에서 state 는 여러 컴포넌트 간에 공유되는 데이터를 뜻한다.
  state: {
    username: '',
  },
  // state의 값이 변경됬을때 특정 상태를 개선할수 있게 사용가능
  // getters의 첫번쨰 인자는 state
  // getters는 기본적으로 return값을 가지고 있음
  getters: {
    // username이 빈 문자열이면 로그인 안된상태
    // 로그인 되면(빈문자열이 아니면) getters가 true로 바뀜
    isLogin(state) {
      return state.username !=== '';
     // 로그인전엔 false, 로그인 후엔 true를 보내주는것
    },
  },
  // mutations은 state의 값을 바꿀수 있는 유일한 방법이다.
  // mutations의 첫번째 인자는 state고, 두번째 인자는 호출할때 넘기는 값을 의미한다.
  // username을 받아서 state가 호출될때 username을 넘기겠단 뜻
  mutations: {
    setUsername(state, username) {
      state.username = username;
    },
  },
});
10. AppHeader에 분기처리 하기
- 분기처리 할때는 template을 사용한다.
<template>
  <header>
    <div>
      <router-link to="/" class="logo">
        TIL
      </router-link>
    </div>

    <div class="navigations">
      <!-- 태그 분기 처리해야함. 이럴때 template 사용-->
      <!-- 1 -->
      <!-- <template v-if="$store.getters.isLogin">
        <span>{{ $store.state.username }}</span>
      </template> -->
      <template v-if="isUserLogin">
        <span>{{ $store.state.username }}</span>
      </template>
      <!-- 2 -->
      <template v-else>
        <router-link to="/login">로그인</router-link>
        <router-link to="/signup">회원가입</router-link>
      </template>
    </div>
  </header>
</template>

<script>
export default {
  computed: {
    isUserLogin() {
      return this.$store.getters.isLogin;
    },
  },
};
</script>

<style scoped>
header {
  display: flex;
  justify-content: space-between;
  align-items: center;
  padding: 10px 20px;
  background-color: #927dfc;
  z-index: 2;
  box-shadow: 0px 3px 10px rgba(0, 0, 0, 0.05);
}
a {
  color: #dedede;
  font-size: 18px;
}
a.logo {
  font-size: 30px;
  font-weight: 900;
  color: white;
}
.logo > span {
  font-size: 14px;
  font-weight: normal;
}
.navigations a {
  margin-left: 10px;
}
.fixed {
  position: fixed;
  top: 0;
  width: 100%;
}
a.router-link-exact-active {
  color: white;
  font-weight: bold;
}
</style>
11. 완성. 로그인 전, 후 AppHeader 모습


'vue.js > vue.js 2' 카테고리의 다른 글
| 120. Request 요청에 Token 넣어서 API 가져오기 | 액시오스 인터셉터 | 인터셉터 모듈화 (0) | 2023.01.24 |
|---|---|
| 119. 로그아웃 기능 구현 | mutations에 clearUsernmae 함수 추가 (0) | 2023.01.24 |
| 117. 로그인 후 Main 페이지 이동 | this.$router.push('/main'); (0) | 2023.01.18 |
| 116. 사용자 폼 유효성 검사 | email 방식인지 체크 | :disabled="!isUsernameValid || !password" (0) | 2023.01.18 |
| 115. 에러 메시지 출력 및 에러 피드백 표시 방법 (0) | 2022.11.22 |